How I Got Internet to My Detached Shop Without Burying Cable
Disclosure: This post contains affiliate links. As an Amazon Associate, I earn from qualifying purchases.
Ever since we bought the shop, one question has been sitting in the back of my mind:
How am I going to get internet out here?
Now, to be fair, getting Wi-Fi to the shop wasn’t exactly the highest priority item on my list. This old building still needs a lot of work, and I’ve got plenty of things to build, fix, clean up, and figure out.
But the more I started thinking about the future of this shop, the more I realized internet was eventually going to become pretty important.
I want to be able to run security cameras out here as I add more tools and equipment. I’d like to have a TV in the shop because, well, I’m a guy and sometimes you just need a TV in the shop. And eventually I can see needing a computer out here for design work, business stuff, orders, or whatever else comes along as this whole Grossman Woodworking and DIY journey grows.
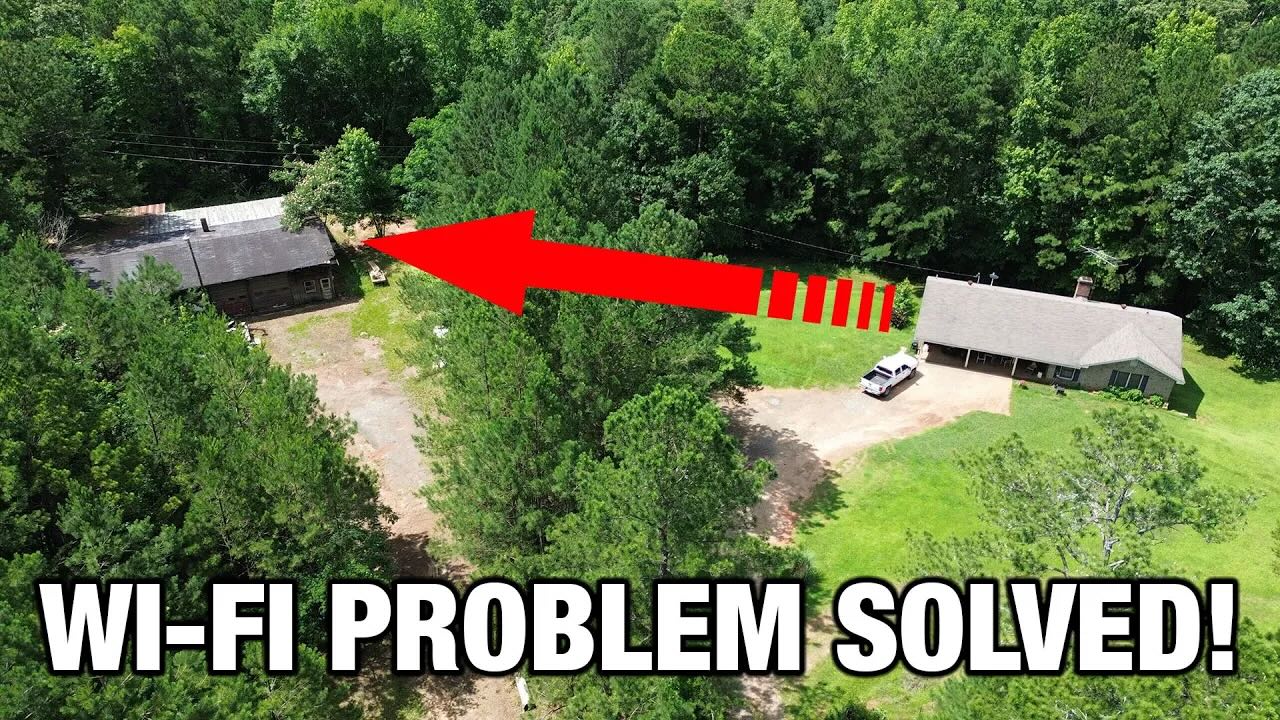
The problem is, my shop sits roughly 200 to 250 feet from the house.
My regular Wi-Fi wasn’t going to reach it. My Wi-Fi extender wasn’t getting the job done either. So I figured I had two options:
- Pay for a second internet service at the shop.
- Rent a trencher and bury Ethernet cable from the house to the shop.
Neither one sounded great.
Then I found out there was another option: a point-to-point wireless bridge.
The Problem: Getting Wi-Fi to a Detached Shop
If you have a detached shop, barn, garage, cabin, or outbuilding, you’ve probably run into this same problem.
Your internet works fine at the house, but the second you walk out to the shop, the signal gets weak or disappears completely.
That may not matter if you’re only out there every now and then. But once you start using that building for work, tools, cameras, streaming, or business, reliable internet starts becoming a pretty big deal.
In my case, I wasn’t trying to do anything crazy. I just needed internet in the shop for a few basic reasons:
- Security cameras
- A future shop TV
- Possible computer or office work
- Uploading, downloading, and general internet use
- Running Wi-Fi-connected devices later on
I already had a Wi-Fi extender in the house that I use for the basement, but it just wouldn’t reach the shop. At around 200 to 250 feet away, with some trees and obstructions in between, it was asking too much from a regular extender.
That’s when I started thinking I’d either have to pay another monthly internet bill or trench in a hardwired connection.
Thankfully, I didn’t have to do either.
What Is a Wireless Bridge?
A wireless bridge is basically a way to send your existing internet connection from one building to another without running a cable the whole distance.
The system I used comes with two outdoor bridge units.
One unit mounts at the house, where your internet service already is. The second unit mounts at the shop, barn, garage, or other building where you want internet.
The two units talk to each other wirelessly. Then, on the receiving end, you can connect that signal to a router or directly to a device with Ethernet.
In plain English, it’s kind of like stretching your internet from one building to another without digging a trench across your yard.
That sounded pretty good to me.
Why I Tried the UeeVii Wireless Bridge
Ironically, right about the time I was trying to figure out how to get internet to the shop, a company called UeeVii reached out and asked if I’d like to try one of their wireless bridge systems.
I’ll be honest: I had never heard of a Wi-Fi bridge before.
But once I understood what it did, I was definitely interested.
According to UeeVii, these systems can reach much farther than I needed under ideal conditions. In my case, I only needed to go a few hundred feet from the house to the shop. The big question was whether it would still work with some trees and less-than-perfect line of sight between the two buildings.
That’s what I wanted to find out.
This wasn’t a complicated install, but my setup did have one small challenge: my modem and router are located on the opposite end of the house from where I needed to mount the bridge unit.
So before I could even test the system, I had to get an Ethernet cable from my router, through the wall, across the attic, and out near the side of the house that faces the shop.
That part took more work than the bridge install itself.
What Comes in the Box
The UeeVii wireless bridge kit I used came with everything needed for the basic setup.
Inside the box were:
- Two wireless bridge units
- Two short Ethernet cables
- Two power adapters/injectors with Ethernet ports
- Mounting clamps for pole-style mounting
- Instructions
The two bridge units are the main pieces. One goes at the house, and one goes at the shop.
The included clamps would let you mount them to something like a satellite dish-style pole if you needed to aim them more precisely. In my case, the house and shop face each other pretty well, so I didn’t need to do anything too fancy.
Installing the House-Side Bridge Unit
The install started inside my house, where my modem and Wi-Fi router are located.
The power adapter that comes with the bridge has two Ethernet ports. One is for the LAN connection from your router. The other is the PoE connection that runs to the bridge unit.
PoE stands for Power over Ethernet, which basically means the Ethernet cable sends both the internet signal and power to the outdoor bridge unit.
That’s handy because I didn’t have to run separate electrical power up into the attic or outside to the unit.
Here’s the basic setup on the house side:
- Plug the UeeVii power adapter into the wall.
- Run an Ethernet cable from your router to the LAN port on the adapter.
- Run another Ethernet cable from the PoE port to the outdoor bridge unit.
- Mount the bridge unit outside facing the shop.
For my setup, I had to run a 100-foot Ethernet cable from the router, through the wall, across the attic, and out through the eave on the side of the house facing the shop.
I mounted the bridge unit high on the outside wall near the eave so I could avoid drilling through the brick. The cable came out through the eave and plugged right into the bridge unit.
That part worked out pretty clean.
Setting the Bridge Units
The underside of the bridge unit is pretty simple.
There are two Ethernet ports, though I only needed one for this installation. There is also a small switch labeled A and B.
For my setup:
- The house-side unit was set to A.
- The shop-side unit was set to B.
There is also a channel selector button. If you have interference or a poor signal, you can change the channel. Both units need to be on the same channel.
I left mine on the default channel to start with.
No need to overcomplicate things unless you have to.
Installing the Shop-Side Bridge Unit
Once the house-side unit was mounted and connected, I took the second bridge unit over to the shop.
This old building already had a hole in the siding that I definitely did not make. I don’t know what made it, and honestly, I’m not sure I want to know.
But for testing purposes, it worked.
Eventually, I’ll make a cleaner hole and mount everything more permanently. For the initial test, though, I used what was already there and didn’t worry too much about aesthetics.
On the shop side, the setup is basically the reverse of the house side:
- Mount the second bridge unit facing the house.
- Run Ethernet from the bridge unit to the PoE port on the adapter.
- Plug the adapter into power.
- Run Ethernet from the LAN port to a router or device.
For my first test, I didn’t hook it to a router yet. I connected it directly to a laptop with an Ethernet port so I could run a speed test and see if the system was actually working.
Testing Internet Speeds at the House and Shop
Before testing the shop, I ran a speed test at the house to get a baseline.
The first test at the house showed around 7.5 Mbps download and a little over 8 Mbps upload. My wife was streaming TV at the time, so that may have affected the results.
I ran it again and got a better result, around 17 Mbps download and 10 Mbps upload.
Then I went back to the shop and tested the signal coming through the wireless bridge.
To my surprise, the shop speed test was actually much faster.
I got close to 100 Mbps download and around 10 to 11 Mbps upload.
Now, I’m not exactly sure why it was faster at the shop than it was inside the house. It may be because the shop test was plugged directly into Ethernet instead of using Wi-Fi. It may also be because my wife had stopped streaming at the house by then.
Either way, the important part was this:
I had a strong internet connection at the shop.
That means I should have no problem hooking this into a Wi-Fi router and running the things I need to run out here.
Was the Wireless Bridge Hard to Install?
The wireless bridge itself was pretty simple.
The only part that took extra effort was my specific house layout. Since my modem and router were on the wrong end of the house, I had to run that 100-foot Ethernet cable through the wall and across the attic.
If your router is already close to the side of the house facing your shop, barn, or garage, your install may be a lot faster.
Once the cable was where it needed to be, the actual bridge setup was straightforward:
- Plug in the adapters
- Connect Ethernet cables
- Mount the two units
- Set one to A and one to B
- Point them toward each other
- Test the connection
That’s about it.
Wireless Bridge vs. Burying Ethernet Cable
Before trying this, burying Ethernet cable seemed like the most likely solution.
And honestly, hardwiring is probably still the best possible connection if you want the most stable setup. But it also means trenching, buying outdoor-rated or direct-burial cable, dealing with conduit, avoiding utilities, and spending a lot more time and effort.
For my situation, a wireless bridge made a lot more sense.
I didn’t have to rent a trencher. I didn’t have to dig up the yard. I didn’t have to pay for a second internet plan. And I was able to get internet to the shop for a lot less money than I expected.
For a detached shop, barn, garage, or other outbuilding a few hundred feet from the house, this seems like a really practical option.
Who This Setup Is Good For
A point-to-point wireless bridge may be worth looking at if you need internet in a:
- Detached garage
- Woodworking shop
- Barn
- Pole barn
- Guest house
- Storage building
- Cabin
- Farm building
- Security camera location
It’s especially useful if the building is too far away for a normal Wi-Fi extender but close enough that you can aim two bridge units toward each other.
Line of sight is still going to matter. Trees, walls, metal buildings, hills, and other obstructions can all affect performance.
In my case, I had some trees between the house and shop, but over a short 200- to 250-foot distance, the system still worked well.
Your results may vary, but for my setup, it did exactly what I needed it to do.
Final Thoughts: Was It Worth It?
For me, this was a win.
I was able to get internet from my house to my detached shop without paying for a second internet service and without trenching Ethernet cable across the yard.
The install was simple, the cost was reasonable, and the speeds I got at the shop were more than enough for what I need right now.
Eventually, I’ll clean up the install, mount everything more permanently, and connect the bridge to a router so I have Wi-Fi throughout the shop.
But even just from this first test, I’m impressed.
If you’re trying to get internet to a detached shop, barn, garage, or other outbuilding, a wireless bridge may be one of the easiest and most affordable ways to do it.
I had never heard of one before this project, but now that I’ve used it, I can see where this could solve a lot of problems for people with shops, farms, homesteads, and rural properties.
And around here, anytime I can avoid digging a trench and paying another monthly bill, I’m going to call that a pretty good day.
Products Mentioned
Watch the Video
Affiliate Disclosure
Some of the links above may be affiliate links, which means I may earn a small commission if you make a purchase through those links. It doesn’t cost you anything extra, and it helps support the projects we’re working on here at Grossman Woodworking and DIY.